Digging deeper into cloudsim
Hope now you know how to install the cloudim in Netbeans (if you don’t know how to do this refer this blog.
Now lets create two virtual machines and four cloudlets in it.
First of all, we should start with basic terminologies in terms of the cloudsim:
-
Virtual Machines: In computing, a virtual machine (VM) is an emulation of a particular computer system.Virtual machines operate based on the computer architecture and functions of a real or hypothetical computer, and their implementations may involve specialized hardware, software, or a combination of both. As cloudsim is a simulation software, it has class for virtual machine named, vm. It runs inside a Host, sharing hostList with other VMs. It processes cloudlets. This processing happens according to a policy, defined by the CloudletScheduler. Each VM has a owner, which can submit cloudlets to the VM to be executed.
-
Cloudlets: A cloudlet is a mobility-enhanced small-scale cloud datacenter that is located at the edge of the Internet. The main purpose of the cloudlet is supporting resource-intensive and interactive mobile applications by providing powerful computing resources to mobile devices with lower latency. In cloudsim, the tasks/processes are the cloudlets. So you need to create a cloudlet that mimics the task that you want and assign the cloudlet(task) to a VM.
Now we will be editing the code from example 1 of the cloudsim (cloudsim comes with sample codes).
Search for comment “VM description”, then change the code as follows till you find a comment: “submit cloudlet list to the broker” :
   // VM description
   int vmid1 = 1,vmid2 = 2;
   int mips = 500;
   long size = 10000; // image size (MB)
   int ram = 512; // vm memory (MB)
   long bw = 1000;
   int pesNumber = 1; // number of cpus
   String vmm = "Xen"; // VMM name

   // create VM
   Vm vm1 = new Vm(vmid1, brokerId, mips, pesNumber, ram, bw, size, vmm, new CloudletSchedulerTimeShared());

   Vm vm2 = new Vm(vmid2, brokerId, mips, pesNumber, ram, bw, size, vmm, new CloudletSchedulerTimeShared());

   // add the VM to the vmList
   vmlist.add(vm1);
   vmlist.add(vm2);

   // submit vm list to the broker
   broker.submitVmList(vmlist);

   // Fifth step: Create one Cloudlet
   cloudletList = new ArrayList<Cloudlet>();

   // Cloudlet properties
   int id = 0;
   long length = 400000;
   long fileSize = 300;
   long outputSize = 300;
   UtilizationModel utilizationModel = new UtilizationModelFull();

   Cloudlet cloudlet1 = new Cloudlet(id, length, pesNumber, fileSize, outputSize, utilizationModel, utilizationModel,           utilizationModel);
   cloudlet1.setUserId(brokerId);
   cloudlet1.setVmId(vmid1);
   id++;
   Cloudlet cloudlet2 = new Cloudlet(id, length, pesNumber, fileSize, outputSize, utilizationModel, utilizationModel,          utilizationModel);
   cloudlet2.setUserId(brokerId);
   cloudlet2.setVmId(vmid1);
   id++;
   Cloudlet cloudlet3 = new Cloudlet(id, length, pesNumber, fileSize, outputSize, utilizationModel, utilizationModel,          utilizationModel);
   cloudlet3.setUserId(brokerId);
   cloudlet3.setVmId(vmid2);
   id++;
   Cloudlet cloudlet4 = new Cloudlet(id, length, pesNumber, fileSize, outputSize, utilizationModel, utilizationModel,          utilizationModel);
   cloudlet4.setUserId(brokerId);
   cloudlet4.setVmId(vmid2);
   // add the cloudlet to the list
   cloudletList.add(cloudlet1);
   cloudletList.add(cloudlet2);
   cloudletList.add(cloudlet3);
   cloudletList.add(cloudlet4);
And rest of the code is same.
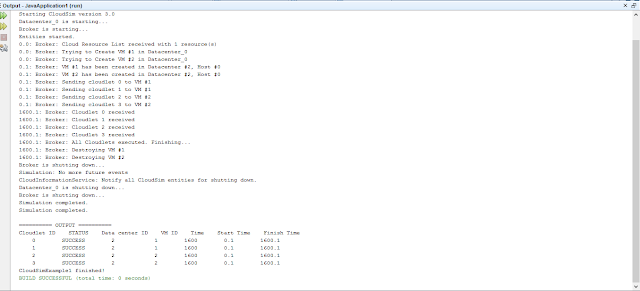
And run this file. Below is the output on the console.